BASIC HTML Body Elements That Help Make A Web Page Look The Way It Does

BODY ELEMENTS ?!

Everyone has a body, and each body looks different.  The same goes for web pages.  Today we are going to talk about the basic body elements that is needed in the HTML code as well as a couple of some basic style elements.

ROOT ELEMENT

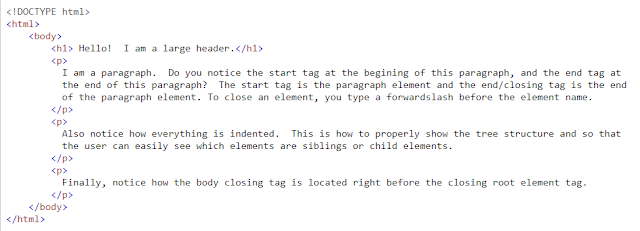
What is a root element? A root element is the sole parent element to all other elements in the document.  What this means is that every other element within the HTML document is going to be either a child or a grandchild of the root element.  Remember in my previous post, that HTML documents are structured like a tree.  Every tree has roots and a trunk.  Think of the root element as the trunk.  For HTML, that root element opening tag will always look like this:  <html> .  The </html> closing tag will be at the end.  Please see the picture below:


HTML ELEMENTS

START AND END/CLOSING TAGS:  Most HTML elements have a start tag and an end tag with the content in between.  Look at the picture above and find the <h1> start tag.  After that, you see two sentences and then the end </h1> tag.  The content that will be rendered on the web page for this line will be a large header that reads:  Hello!  I am a large header.

SELF CLOSING TAGS:  It is always good practice to close ALL tags, including "self closing tags".  Older HTML has the line break tag as <br> with no closing tag.  Best practice for this would be to type it as <br/> that way it is closed and you will not risk having problems in the future.

<body></body> :  The body tag defines the document body of the web page.  Paragraphs, tables, pictures, etc. would all be content that needs to be nested in between the start and closing <body> tags.

<h1></h1>:   This tag is for a header.  Here is an example of an <h1> header tag:

It Would Look Like This.

There will be a future styling post that will go into detail about header tags.

<p></p>:  This tag is for paragraphs.  Every time you want to start a new paragraph, you would start it with this tag.  Please review the photo below again:
Do you see how each paragraph has a new start and end <p> tag?  Also, do you see how it is nestled within the <body> tag (There will be a future post about parent/child/sibling elements) ?

It is important to understand the structure of how an HTML document is written.  If you can understand that, then learning the many different elements that are available to you will be easy.
So sit back, relax, and enjoy the next few posts where I will be going into detail the awesome element options you can use to style your web page!

Follow me as I learn to build my website bit by bit!    IronTreeDev.com

Photo by Kira auf der Heide on Unsplash


Comments

Popular posts from this blog

XPATH and XPATH Expressions In XMLLINT

XPATH And XPATH Expressions Earlier, I told you about xmllint and xmllint for html files .  Let's say you just want to parse the <span> tags within your html file or just your <span lang="el"> tags? Enter:  Xpath. Xpath is yet another option available within the xmllint language. Remember, an Xpath is used to navigate through elements and attributes in xml and html documents.  Xpath uses Xpath Expressions to select nodes or node sets within a document. Example 1 .  Looking for all of the <span> tags within an html document. xmllint -- html -- xpath " // span" StedmanLesson10.html xmllint = This tells the command line that we are going to be using the xmllint language. space = because we always have space in between commands -- = Remember, these are the two hyphen-minus characters that we need to tell the command line that we are going to use an xmllint option. html = This is the xmllint option we want to

Back To The Basics

Click photo above to see photo clearly  It's Been A LOOONG Minute since I have coded!!   Even so, I decided to give JavaScript another try.  I always seem to do good and then when I get to this one area, I always seem to hit a brick wall.  Well....nothing like getting back up and trying again right?   I decided to try Rithm School's online JavaScript Fundamentals FREE course .  I have never joined their school but their free courses tend to explain things in a way my brain understands it.  💁 To let you know how much I have forgotten in the coding world, I couldn't even remember how to write the basic commands for an HTML document! Yesterday I started the fundamentals free course and I am so glad that I did.  Because of time, I only made it through the JavaScript History and Setup chapter, but that chapter was enough to get my memory flowing again!   It started to feel familiar and I quickly remembered why I enjoyed coding so much.  Yesterday and this morning, I just erased

GIT Commands: Pull, Add, Commit, Push.....and sometimes Revert

Pull, Add, Commit, Push ...... then Repeat We talked about GIT, GIT Hub , and the three different areas GIT works in.  Now it is time to talk about some of the most used GIT commands.   I am currently working with a team on a project called Stedman.  We are all using the GIT Hub server to track our work as we make changes to the files within the Stedman project.   Many changes can be made by other members of the team, from the time I sign off to the time I sign back on.  How do I get the changes they made to a file I need to work on, onto my computer? ENTER GIT COMMANDS : 1.  The first thing I do is goto my command window on my computer and navigate to the directory where the file I want to work in is located (this will be a directory that is being tracked by GIT).   *If you need a quick refresher:  cd file_name   will take you through each of your directories until you reach your desired location.  Issuing an  ls   command will list the files (sub-di